


A well-functioning downspout is just as important a key to a stable foundation as an efficient gutter.
It may seem like minor exterior details of your home, but they play a vital role in safeguarding your house’s structural integrity. It supports gutters to channel gallons of water safely away from your house’s foundation. When a downspout becomes faulty, loose, or cracked, or starts leaking, it can cause severe damage if left untreated.
Fortunately, you don’t have to rush for expensive replacements or professional repairs for every minor issue. Most small problems can be addressed using a downspout repair kit, making it a practical, cost-efficient solution for many homeowners.
In this guide, you’ll learn the importance of a healthy downspout for your house, what a downspout repair kit is and what it constitutes, which problems you can repair yourself, and how to complete repairs step by step.
Why is a functional downspout essential for your house?
Many homeowners focus on cleaning and maintaining their gutters, but often overlook the downspouts. While gutters are essential to collect rainwater, it is the downspouts that are truly responsible for channeling that rainwater away from the foundation of your house. Even a minor fault in the downspout can lead to water pooling around the foundation and create structural issues.
- A well-functioning downspout is essential because:
It protects your foundation. - Prevents basement flooding.
- Preserve your surrounding landscape.
- Reduce soil erosion
- Protect Your Siding and Fascia
- Extend the Life of Your Gutter System
Fortunately, not every minor issue in your downspout requires complete replacement or a professional fix. Most problems can be resolved with the right downspout repair kit before they turn into bigger concerns.
What is a Downspout Repair Kit, and what does it typically constitute?
A downspout repair kit is a DIY hardware collection of components designed to fix common gutter and drainage issues, such as damaged, leaking, disconnected, or crushed sections of a gutter downspout without replacing the entire drainage system.
These kits help homeowners resolve minor downspout issues on their own, save money, and extend the lifespan of their gutter system.
While the exact contents of a downspout repair kit vary by type and manufacturer, a typical kit includes connectors and couplers, screws, mounting brackets, waterproof sealant, aluminum repair patches, elbows, extension pieces, rivets or fasteners, and step-by-step installation instructions.
Common Downspout Issues You Can Fix Using Gutter Downspout Repair Kit
Downspout repair kits can be handy when your downspout requires small, urgent fixes. However, it is not a replacement for a professional fix. Knowing which problems can easily be solved with a downspout repair kit, and when you require a downspout replacement, can save you a lot of time and unnecessary hassle.
The minor issues that homeowners can easily tackle using a quality gutter downspout repair kit include loose downspout sections, small holes, rust spots, leaking joints, detached elbows, and minor Cracks
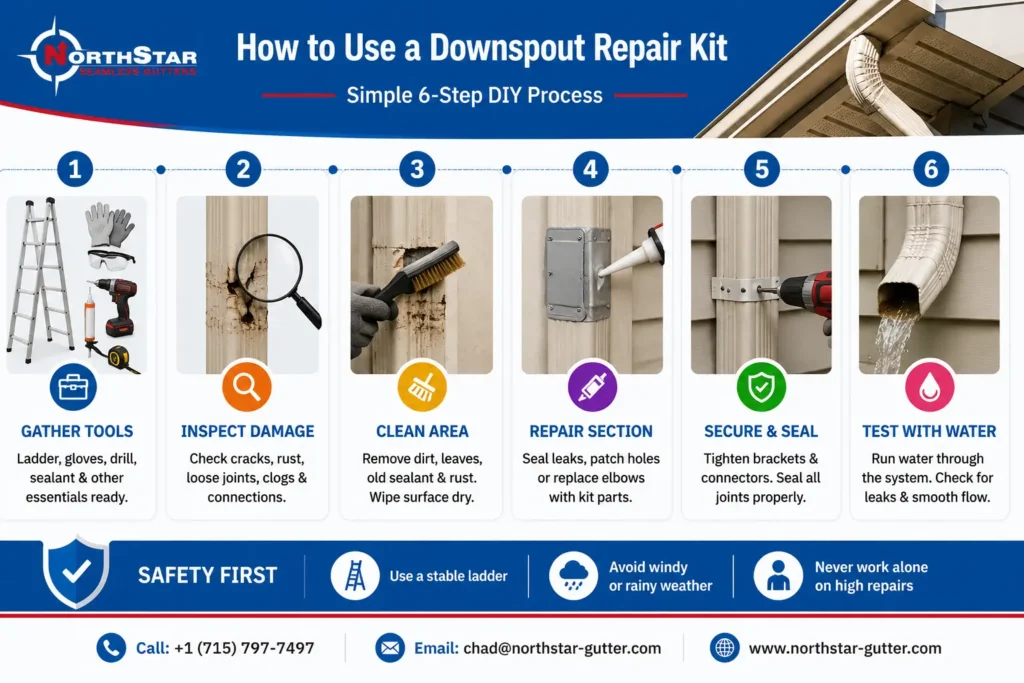
How to Use a Downspout Repair Kit (Step-by-Step Guide)
With your quality downspout repair kit, here is a step-by-step guide on how to actually use the kit to fix your problem
Step 1: Gather other tools required along with the repair kit
Before you start fixing your downspout, ensure you have the other tools required with the repair kit prepared beforehand. This can make the process much smoother and easier for you. Depending on the section you’re repairing, you typically need a sturdy extension ladder, work gloves, safety glasses, cordless drill, screwdriver, tin snips, measuring tape, utility knife, caulking or sealant gun and garden hose for testing
It is also recommended to take standard safety precautions, such as placing your ladder on stable ground, avoiding repairs during rainy or windy weather, and avoiding working alone in case the repair requires you to climb high on the roof.
Step 2: Identify the problem
If you are looking to repair your downspout, it’s most likely that you noticed a symptom. A wet stripe on the basement wall after a hard rain, soil washed out beside the foundation, or a new crack on the driveway edge after rapid snowmelt.
It is important that you first identify the root cause and inspect the full length of the downspout to ensure there are no other concerns apart from the visible problem that require your attention, to avoid multiple fixes.
Look for cracks, rust spots, loose joints, detached brackets, bent elbows, separated sections, clogged areas, or water stains indicating hidden leaks. Ensure that the downspout connects to both the gutter and the discharge area.
Step 3: Clean the Damaged Area
Begin by cleaning the surface to ensure missing any concerns and create a long-lasting repair. Remove all the dirt, leaves, debris, old sealant, loose paint, and rust flakes until you are left with a clean surface to work on. You can additionally use a wire brush or sandpaper to smooth rusted areas if necessary.
Once cleaned, wipe the surface dry before applying any sealant or repair patch to avoid trapped moisture from weakening the bond and shortening the life of the repair.
Step 4: Repair the Damaged Section
The repair method depends on the concern. If the downspout has leaking joints, repair the damage using waterproof sealant. For small holes in the downspout, position the aluminum repair patch over the damaged area before sealing the edges to prevent water infiltration.
In case you have a bent or broken elbow or connector, replace it with the matching component from your repair kit.
Step 5: Secure Everything Properly
Once the damaged section has been repaired or replaced, secure every connection again. Use screws, brackets, or rivets from your repair kit to fasten each section securely. Check that the downspout sits flush against your home’s exterior and that every bracket is tightened evenly.
Avoid overtightening the screws, as too much force can strip the fasteners or deform aluminum downspouts, creating new gaps. In case of an elbow replacement or extension, ensure proper alignment for the proper flow of water towards the discharge point.
Once secured, seal all joints properly using a high -quality waterproof gutter sealant around every repaired seam, connector, coupler, and patched area.
Be sure to follow the manufacturer’s recommended curing time before exposing the repair to water. Depending on the product, this may range from several hours to a full day.
Step 6: Test with Water
Now that your downspout is repaired, test your work to ensure all concerns have been properly fixed.
You can use a garden hose to run water through the gutter system and observe how it flows through the repaired downspout.
Ensure there are no leaking joints, drips around patched holes, loose connections, misaligned sections, water pooling near the foundation, and proper drainage through the bottom extension
If everything remains dry and the water flows smoothly away from your home, congratulations, your repair has been successful!
Signs Your Downspout Requires More Than Just Repair
While downspout repair kits can solve many minor issues, in case of severe damage, it is better to opt for professional repair. Knowing when to call a professional can save you time, money, and costly property damage.
It is always advisable to opt for professional repair in case of :
- Storm Damage
- Extensive Rust and Corrosion
- Collapsed or Severely Bent Downspouts
- Foundation Drainage Problems
- Recurring Leaks
- Detached Gutters
- Improper Gutter Slope
Repair Kit vs. Professional Downspout Repair
Many homeowners struggle to decide whether their downspout needs can be handled with a DIY repair or require a professional repair. Understanding the extent of damage, comfort level, long-term goals, and sufficient knowledge about the difference between DIY and professional repair can help you make an informed decision.
| DIY Downspout Repair Kit | Professional Downspout Repair |
|---|---|
| Lower upfront cost | Long-lasting repair solutions |
| Ideal for small holes and loose joints | Addresses underlying drainage issues |
| Can often be completed in a few hours | Saves time and eliminates guesswork |
| Requires basic tools and DIY skills | Expert installation and workmanship |
| May serve as a temporary fix for aging systems | More durable solution for significant damage |
Tips to Prevent Future Downspout Damage
Prevention is always better than cure, or in the case of downspouts, repair. Following a few simple practices throughout the year can help extend the life of your downspout and avoid frequent repairs.
- Flush downspouts regularly
- Clean Your Gutters Twice a Year
- Install Gutter Guards
- Always Inspect After Major Storms
- Tighten Loose Brackets
- Trim Overhanging Branches
- Check joints seasonally
Final Thoughts
A well-functioning downspout does more than just water away from our house’s foundation. It is also essential to protect your house’s landscaping, siding, and overall structural integrity.
While a downspout repair kit is enough to mend minor damage, it is also important not to rely on it permanently and ignore its long-term needs. In case of extensive corrosion, recurring leaks, storm damage, or drainage issues, it is advisable to call for the experience and expertise of a professional gutter contractor.
That’s where NorthStar Seamless Gutter comes in.
With years of experience serving homeowners, NorthStar Seamless Gutter provides expert inspections, professional downspout repairs, gutter replacements, and preventative maintenance that protects your home year-round.
Whether it’s a recurring leak, storm damage or an aging gutter system requiring professional replacement, our team of experts will carefully inspect and then resolve the problem at the root, rather than simply treating the symptoms.
So, contact our team today to schedule an inspection and receive customised, long-lasting solutions tailored to your home’s needs.
FAQs
1. Can I repair a damaged downspout myself?
Yes. With the help of a downspout repair kit, you can repair many minor issues in your downspout. However, if your downspout has severe damage, it is recommended to opt for a professional repair.
2. What comes in a gutter downspout repair kit?
While the exact contents vary depending upon the manufacturer or type of the kit, a typical gutter downspout repair kit may include connectors, couplers, screws, brackets, waterproof sealant, aluminum repair patches, elbows, extension pieces, rivets, and installation instructions.
3. How long does a downspout repair last?
A properly completed repair can easily last up to several years.
4. When should I replace my downspout?
If your downspout has widespread corrosion, multiple leaks, severe dents, collapsed sections, or recurring problems, a professional replacement is often recommended over a DIY fix.
5. Are repair kits compatible with all gutter systems?
No. Downspouts come in different materials, shapes, and sizes. It is advisable to measure your existing downspout and purchase a kit compatible with your gutter system.
Also read : complete-guide-to-gutter-installation-in-wisconsin-2026, how-to-use-half-round-gutters,. do-leaf-guards-really-work-heres-what-you-need-to-know, how-rainwater-harvesting-helps-fight-urban-water-shortages,leafguard-gutters-cost, half-round-copper-gutters-guide-2026, k-style-gutters-complete-guide, downspout-installation-complete-guide, snow-guards-for-metal-roofs, gutter-installation-in-wisconsin, gutter-guards-guide, gutter-repair-10-warning-signs, Gutter Downspouts, Gutter Guard Installation, Leaf Guard vs Gutter Screens, Leaf Filters vs Leaf Guards, Gutter Downspout Extensions, Downspout Replacement, half-round-gutter-installation/, rain-gutter-installation-guide, Clogged Downspout Drain, Gutter Replacement